You built your website with Breakdance Builder because it promised speed and power. Now your pages are dragging, visitors are bouncing, and you’re wondering what went wrong.
The truth is, even the fastest page builder needs the right configuration and supporting infrastructure to shine.
Breakdance was built from the ground up to be highly performant, using clean code and efficient markup. But performance isn’t just about the builder. Your hosting, plugins, settings, and optimization choices all play a role. When any of these pieces fall out of alignment, your site suffers.
This guide will show you exactly how to diagnose and fix speed problems with Breakdance. You’ll learn which Breakdance settings to toggle, how to pick the right caching plugin, when to use a CDN, and how to optimize every element of your WordPress stack.
By the end, you’ll have a clear roadmap to speed up your wordpress website.
Why does your Breakdance Website Feels Slow?
Speed is relative. What feels slow to you might be loading fine for others. Before making any changes, you need to measure.
Your perceived speed comes from multiple factors working together. Server response time, image sizes, JavaScript execution, render-blocking resources, and caching all contribute to the final result.
Slow-loading pages lead to increased bounce rates, reduced user engagement, and a negative impact on overall website performance. Search engines like Google also prioritize faster-loading websites in their rankings.
Most speed problems come from three sources.
- First, your hosting server might be weak or overloaded.
- Second, your site might be loading too many resources at once.
- Third, caching and optimization might not be set up correctly. Breakdance itself is rarely the culprit.
Here’s a list of the best control panel hosting that are fast and easy to use.
When you click through your site, you’re using a cached version stored in your browser. Your actual visitors are hitting the server fresh every time. That’s why you need to test with tools that simulate real user experiences, not just your own browsing.
What Breakdance Performance Settings should you Enable or Disable to Speed up your WordPress Website?
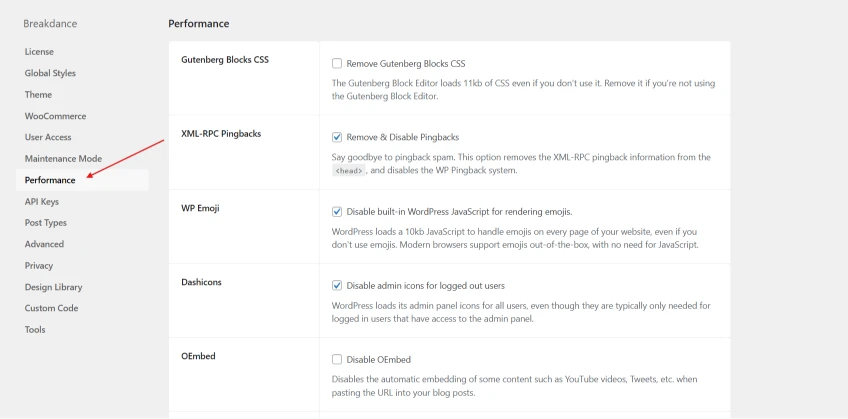
Breakdance includes built-in performance settings that disable unnecessary WordPress features. These optimizations enhance website performance by reducing unnecessary load. You’ll find them under Breakdance > Settings > Performance in your WordPress admin panel.
Let’s walk through each setting and when to use it.
Remove Gutenberg Blocks CSS
This prevents WordPress from loading Gutenberg’s CSS if not in use. If you’re building everything with Breakdance and not using the block editor for posts or pages, turn this on. You’ll eliminate one entire stylesheet that was loading on every page for no reason.
Go to Breakdance > Settings > Performance and toggle “Disable Gutenberg Block CSS” to Enabled. Save your settings. Your pages will now skip loading block editor styles.
Remove & Disable Pingbacks (XML-RPC Pingbacks)
This helps prevent pingback spam on your blog posts, an outdated function primarily used for spam. XML-RPC is a protocol that lets other sites notify you when they link to your content. In practice, spammers abuse it.
Turn this setting on unless you specifically need remote publishing functionality. Most users don’t. Disabling XML-RPC also slightly improves security by closing off an attack vector.
Disable WP Emoji
This disables the outdated JavaScript used for emojis, unnecessary since modern browsers support emojis natively. WordPress loads a script to render emoji characters on older browsers. Your visitors are almost certainly using modern browsers that handle emoji without help.
Enable this setting to remove the wp-emoji-release.min.js file from your pages. You’ll save an HTTP request and a few kilobytes on every page load.
Disable Dashicons
This stops WordPress from loading admin panel icons for logged-out users, reducing unnecessary data load. Dashicons is a font file WordPress uses for admin interface icons. Your front-end visitors don’t need it.
Turn this on. The only exception is if your theme uses Dashicons in the public-facing design, which is rare. Most themes use their own icon sets or Font Awesome.
Disable OEmbed
This disables automatic embedding of content like YouTube videos or tweets. If you manually embed videos and social media using iframe codes or plugins, you don’t need oEmbed. It adds processing overhead for every post load.
Enable this if you’re comfortable embedding media manually. Leave it disabled if you frequently paste video or social media URLs directly into content and want them to auto-embed.
Disable RSD Links
This removes the Really Simple Discovery link from your site header. RSD helps external apps discover your blog’s API endpoints. Unless you’re publishing via desktop blogging software (which almost nobody does anymore), you can disable this.
Go ahead and turn it on. This is safe for 99% of sites.
Disable WLW Link
Windows Live Writer was a desktop blogging tool that Microsoft discontinued years ago. The WLW link in your header serves no purpose today. Enable this setting to remove it.
Disable REST API Metadata in Head
The WordPress REST API powers modern interactions between your site and external applications. The metadata link in your HTML head helps external tools discover your API. Most sites don’t need this publicly announced.
Turn this on unless you’re building a headless WordPress setup or connecting external applications to your site via the REST API.
Disable WordPress Generator Meta Tag
This removes the WordPress version number from your site’s HTML. It’s a minor security improvement (it makes it slightly harder for automated scanners to identify vulnerable WordPress versions) and reduces HTML bloat by a few bytes.
Enable this setting. There’s no downside.
Disable Shortlink Tag
WordPress generates shortlinks (yoursite.com/?p=123) for every post and page. These appear as link tags in your HTML head. Modern SEO doesn’t use them, and they just add clutter.
Turn this on to remove the shortlink tags from your pages.
Disable Relational Links For Single Posts
These are link tags that tell browsers about previous and next posts in your archive. They were meant to help with pagination and navigation. Modern sites don’t need them.
Enable this setting unless you have a specific SEO plugin that relies on these tags (rare).
Disable RSS Feed Links
If you’re not using RSS feeds for your blog, you can remove the RSS feed links from your header. Most modern sites use email lists and social media instead of RSS.
Turn this on if you don’t actively promote or use RSS feeds. Leave it off if you have RSS subscribers.
Do Breakdance Global Styles Slow Down WordPress Website (and What Should you do to Avoid it)?
Your Global Styles in Breakdance control design elements across your entire site.
Poorly configured global styles force the builder to output more CSS, which slows down your pages.
Go to Breakdance > Global Styles. Here’s what matters for performance.
Use a minimal set of font families. Every font you add requires additional HTTP requests and file downloads. Stick to one or two font families maximum. If you’re using Google Fonts, consider hosting them locally with a plugin instead.
Limit your color palette. While having 50 colors won’t directly hurt performance, it makes your stylesheet larger and harder for browsers to parse. Define 5-10 colors maximum in your global palette.
Avoid excessive custom breakpoints. Breakdance generates CSS for each breakpoint you define. More breakpoints mean larger CSS files. The default breakpoints (desktop, tablet, mobile) work for 90% of designs.
What are the best WooCommerce Performance Settings for Breakdance Websites?
If you’re running WooCommerce with Breakdance, you have extra performance considerations. WooCommerce adds database queries and scripts that can bog down your site.
Go to Breakdance > Settings > WooCommerce. Make sure you’re only loading WooCommerce scripts on pages that need them. Breakdance handles this automatically, but verify that cart and checkout pages are working properly with your caching plugin.
For better WooCommerce performance overall, use object caching. Object caching stores database query results in memory so they can be reused. Plugins like Redis Object Cache or Memcached work with LiteSpeed Cache (Free) or WP Rocket (Paid) to dramatically speed up WooCommerce stores.
Disable AJAX cart fragments if you don’t need live cart updates in your header. WooCommerce uses AJAX to refresh cart totals, which can slow down every page load. Go to your caching plugin settings and look for options to disable cart fragments.
Clean your WooCommerce transients Weekly or Monthly. WooCommerce stores temporary data (transients) in your database. Over time, these pile up. Database optimization plugins (covered later) handle this automatically.
What are Types of Caching and How They Work?
Caching is the single most important factor in WordPress speed. Let’s break down what caching actually does and why it matters.
When someone visits your WordPress site, the server has to execute PHP code, query the database, assemble HTML, and send it back to their browser. This process takes time. Caching saves the final result and reuses it for the next visitor.
There are several types of caching that work at different levels.
Page Caching
This is the most impactful type. Page caching saves the complete HTML of your pages and serves that saved version instead of rebuilding it every time. Rather than waiting for WordPress and PHP to assemble the pages with every request, a page cache can provide the snapshots much faster.
Think of page caching like meal prep. Instead of cooking dinner from scratch every night, you cook several meals on Sunday and reheat them all week. Your visitors get their meal (web page) much faster.
Browser Caching
Browser caching tells visitors’ browsers to save copies of your images, CSS, and JavaScript files. On their next visit, the browser loads these files from its local storage instead of downloading them again.
Browser caching is like keeping salt and pepper on your table instead of fetching them from the pantry for every meal. Small files stay cached locally, reducing bandwidth and improving speed.
Object Caching
Object caching stores database query results in memory. WooCommerce and membership sites benefit enormously from object caching because they run complex database queries on every page load.
Object caching uses tools like Memcached or Redis for faster database queries. This type of caching requires server support. Check with your host to see if they offer Redis or Memcached.
Server Caching
Some hosting providers handle caching at the server level. LiteSpeed Cache uses server-level caching which is faster than file-based caching. If your host uses LiteSpeed servers, server-level caching is automatically available and extremely fast.
Server caching happens before the request even reaches WordPress. It’s the fastest type of caching available.
Which Caching Plugin is the Best for Breakdance Builder Websites?
You need a caching plugin. The question is which one. Your choice depends on your hosting environment and technical comfort level.
WP Rocket
WP Rocket is a premium plugin ($59 per year for one site) that prioritizes ease of use. WP Rocket applies 80% of web performance best practices automatically, without having to enable any options.
WP Rocket automatically generates cached pages in the background and uses rewrite rules to display them. You install it, activate it, and it works. For beginners, this is ideal.
WP Rocket works on any hosting provider. It’s compatible with 99% of hosts and the only caching plugin allowed by WordPress.com and Pressable. You don’t need special server software.
The downsides? WP Rocket costs money. It doesn’t include image optimization, so you need a separate plugin or CDN for that. Some users also report issues with the automatic “Remove Unused CSS” feature breaking designs.
For Breakdance users, WP Rocket is a solid choice if you want simplicity and don’t mind paying.
LiteSpeed Cache
LiteSpeed Cache is completely free and extremely powerful. LiteSpeed Cache uses server-level caching, which is faster than file-based caching, and uses LSAPI for PHP processing, which is faster than PHP-FPM.
The catch? LiteSpeed Cache is designed to run more efficiently on hosting platforms that use LiteSpeed servers; most features won’t function on other server software. If your host doesn’t use LiteSpeed, you lose the main advantage.
LiteSpeed Cache includes image optimization, CDN integration (QUIC.cloud), critical CSS generation, and database optimization. It has several features not found in WP Rocket, including server-side caching, image optimization, and localizing JS files. For LiteSpeed hosting users, it’s the best option.
The downside is complexity. LiteSpeed’s dashboard is packed with dozens of advanced settings, tabs, and technical options, which can be overwhelming for beginners. You’ll need to spend time configuring it properly or use one of the preset configurations.
For Breakdance users on LiteSpeed hosting (Hostinger, Namecheap, many others), LiteSpeed Cache is the top choice.
WP Fastest Cache
WP Fastest Cache is a free plugin that sits between WP Rocket and LiteSpeed Cache in complexity. It provides page caching, minification, and browser caching with a simpler interface than LiteSpeed.
The free version works fine for basic sites. The premium version ($49 one-time) adds image optimization, database cleanup, and CDN integration. It works on any hosting provider.
For Breakdance users who want more control than WP Rocket offers but less complexity than LiteSpeed Cache, WP Fastest Cache is worth considering.
W3 Total Cache
W3 Total Cache is a veteran free plugin with extensive features. It supports page caching, browser caching, object caching, database caching, and CDN integration.
The problem is its interface. W3 Total Cache overwhelms beginners with options and technical jargon. It’s powerful but requires technical knowledge to configure correctly. Misconfiguration can actually slow down your site.
Unless you’re comfortable with caching concepts and server configurations, skip W3 Total Cache.
What I Recommend
If you’re on LiteSpeed hosting, use LiteSpeed Cache. The performance gains are substantial, and it’s free.
If you’re not on LiteSpeed hosting and you’re a beginner, use WP Rocket. Yes, it costs money, but the time you save configuring it and the peace of mind knowing it won’t break your site is worth it.
If you’re technically comfortable and want a free solution on non-LiteSpeed hosting, try WP Fastest Cache or Cache Enabler.
What is a CDN? How does it improve the Website’s Speed? And how to set it up?
A Content Delivery Network (CDN) distributes your site’s files across servers worldwide. When someone visits your site, the CDN delivers content from the server closest to them, making your pages load much faster.
Cloudflare is the most popular free CDN. Their free tier provides more features and better performance than many paid CDN services. It includes DDoS protection, SSL, and a global network of servers.
Here’s how to set it up for your Breakdance site.
Step 1: Create a Cloudflare Account
Go to cloudflare.com and sign up for a free account. Verify your email address. The process takes two minutes.
Step 2: Add Your Site
Log in to your Cloudflare account and click Add site at the top right of the dashboard. Enter your WordPress site’s domain name (yourdomain.com, not www.yourdomain.com) and click Add site.
Cloudflare will scan your DNS records. This takes about a minute.
Step 3: Choose a Plan
Cloudflare offers four pricing plans: Free, Pro, Business, and Enterprise. Select the Free plan. You can upgrade later if needed. Most small to medium sites never need to upgrade.
Step 4: Review DNS Records
Cloudflare shows you the DNS records it found. These should match the records at your current DNS provider (usually your hosting company or domain registrar). Verify they’re correct and click Continue.
Step 5: Change Your Nameservers
This is the critical step. Cloudflare will provide two nameservers that you need to add to your domain registrar. A nameserver is like a phone book for the internet. It tells browsers where to find your site.
Log in to your domain registrar (the company where you bought your domain). Find the DNS or nameserver settings. Replace the existing nameservers with the two Cloudflare-provided provided. Each registrar’s interface is different, but look for settings like “Nameservers,” “DNS Settings,” or “Domain Management.”
Save your changes. Nameserver updates can take up to 48 hours to propagate, but usually complete in a few hours.
Step 6: Verify in Cloudflare
Go back to Cloudflare and click “Check nameservers now.” If enough time has passed, Cloudflare will confirm your site is now active on their network. You’ll receive an email when the setup is complete.
Step 7: Enable Auto Minify
The Auto Minify feature minifies JavaScript, CSS, and HTML files by removing unnecessary characters to improve page load times. In your Cloudflare dashboard, go to Speed > Optimization > Auto Minify. Check JavaScript, CSS, and HTML.
Be careful here. Auto Minify can break some sites. If your site looks broken after enabling this, turn it back off.
Step 8: Enable Brotli Compression
Brotli is a compression feature that ensures quick data transfers between servers and browsers; it has much faster transfer time than GZIP compression. Cloudflare enables Brotli automatically on all plans. Verify it’s active in Speed > Optimization > Brotli.
Step 9: Configure SSL
Go to SSL/TLS in your Cloudflare dashboard. If your WordPress site already has an SSL certificate (you see https:// in your address bar), set the encryption mode to “Full” or “Full (Strict).”
If you don’t have SSL on your origin server, set it to “Flexible.” This encrypts the connection between visitors and Cloudflare (but not between Cloudflare and your server). It’s better than nothing but not ideal.
Step 10: Set Up Page Rules
You can use page rules to customize how Cloudflare functions on specific pages of your site. With a free account, you get three page rules.
Create a rule for your WordPress admin area. Click Rules > Create Page Rule. Enter the URL pattern: yoursite.com/wp-admin/* (replace yoursite.com with your actual domain). Set “Cache Level” to “Bypass.” This prevents Cloudflare from caching your admin dashboard. Save and Deploy.
Create another rule for your WordPress login page. Pattern: yoursite.com/wp-login.php. Set “Security Level” to “High” and “Cache Level” to “Bypass.” This protects your login page from brute force attacks. Save and Deploy.
Your third page rule is optional. Save it for special cases or leave it unused.
Verifying Cloudflare is Working
Right-click on your site, click Inspect, then click the Network tab; if your cf-cache-status shows HIT, your CDN is working. This confirms Cloudflare is serving cached versions of your files.
Should you add Custom Code for Performance?
Custom Code in Breakdance lets you add CSS, JavaScript, or PHP snippets to your site. This is powerful but dangerous for performance if misused.
Go to Breakdance > Settings > Custom Code. You can add code in the header (loads on every page before content) or footer (loads on every page after content).
Only add code here if it absolutely needs to run on every page. If you’re adding JavaScript for a contact form that only appears on one page, don’t put it in global custom code. Use Breakdance’s local JavaScript on that specific page instead.
When adding CSS in Custom Code, make sure it’s minified. Minified CSS removes all spaces, line breaks, and comments to reduce file size. You can use an online CSS minifier tool before pasting your code.
For JavaScript, avoid blocking the render. If possible, add the async or defer attributes to script tags. This lets the browser load the script without stopping the page render.
<script async src="your-script.js"></script>The async attribute loads the script asynchronously. This means the script won’t block page rendering while it downloads.
Avoid jQuery if you can. Modern JavaScript (vanilla JS) is faster and doesn’t require loading an entire library. If you must use jQuery, check if WordPress already loads it. Don’t load jQuery twice.
How to optimize CSS and JavaScript in Breakdance for faster WordPress speed?
Your site loads multiple CSS and JavaScript files. Each one requires an HTTP request, download time, and parsing time. Optimizing these files is crucial for speed.
Minification
Minification removes all unnecessary characters from code without changing functionality. Spaces, line breaks, and comments are stripped out, reducing file size.
Your caching plugin probably handles this automatically. In WP Rocket, go to File Optimization and enable “Minify CSS Files” and “Minify JavaScript Files.” In LiteSpeed Cache, go to Page Optimization > CSS Settings and JS Settings and enable minification for both.
Combining Files
Combining multiple CSS files into one reduces HTTP requests. The browser makes one request instead of five. But there’s a tradeoff: if you combine everything, a visitor who only needs one file still downloads all five.
Most caching plugins offer file combination. Test it carefully. On HTTP/2 servers (which most modern servers use), combining files sometimes doesn’t help and can actually hurt performance.
Critical CSS
Critical CSS is the minimum CSS needed to render above-the-fold content. By loading only critical CSS initially and deferring the rest, your pages appear to load faster.
WP Rocket has an automatic critical CSS generator (premium feature). LiteSpeed Cache also generates critical CSS automatically. Enable this in your caching plugin settings.
Be warned: critical CSS can break layouts if generated incorrectly. Test thoroughly on different pages and devices before deploying it sitewide.
Deferring JavaScript
JavaScript blocks page rendering by default. When the browser encounters a script tag, it stops rendering HTML and downloads and executes the script first. This slows down your page.
Deferring JavaScript tells the browser to download scripts while continuing to render the page. The scripts execute after the HTML is fully rendered.
In WP Rocket, go to File Optimization > JavaScript Files and enable “Load JavaScript deferred.” WP Rocket automatically handles compatibility issues. In LiteSpeed Cache, go to Page Optimization > JS Settings and enable “Load JS Deferred.“
Some scripts break when deferred. jQuery and scripts that depend on jQuery often have issues. Your caching plugin should let you exclude specific scripts from defer. If your site breaks, check your browser console for errors, identify the problematic script, and exclude it.
Removing Unused CSS
Your theme and plugins load CSS for features you don’t use. Removing unused CSS can cut stylesheet sizes by 70% or more.
WP Rocket Premium has a “Remove Unused CSS” feature. LiteSpeed Cache has a similar feature called “Combine CSS” with unused CSS removal. Enable this carefully and test every page on your site.
The risk: these tools sometimes remove CSS that IS used, causing layout breaks. They analyze pages and try to detect used styles, but they’re not perfect. Always test thoroughly.
Fonts Optimization
Web fonts are beautiful but slow. Each font family and weight requires a separate file download.
First, audit your fonts. How many families are you using? How many weights (regular, bold, light, etc.) are you using? Cut this down to the minimum. Use one or two font families maximum, and only the weights you actually use.
Second, consider hosting fonts locally instead of loading them from Google Fonts. Plugins like OMGF (Optimize My Google Fonts) download Google Fonts to your server and serve them locally. This reduces external HTTP requests and gives you more control over caching.
Third, use font-display: swap in your CSS. This tells the browser to show system fonts immediately while custom fonts load in the background, then swap them in when ready. It prevents invisible text during load.
@font-face {
  font-family: 'Your Font';
  src: url('yourfont.woff2');
  font-display: swap;
}
This rule makes fonts load without blocking text rendering.
Preconnect and DNS Prefetch
When your site loads resources from external domains (Google Fonts, analytics, CDNs), the browser needs to establish a connection. This takes time.
Preconnect tells the browser to establish connections early, before they’re needed. Add this to your header:
<link rel="preconnect" href="https://fonts.googleapis.com">This code tells the browser to connect to Google Fonts immediately. This reduces the delay when fonts are actually requested.
DNS Prefetch is similar but only resolves the domain name. It’s faster than preconnect but does less:
<link rel="dns-prefetch" href="https://analytics.google.com">Use preconnect for resources you know you’ll load. Use DNS prefetch for resources you might load.
Your caching plugin might handle this automatically. Check WP Rocket’s “Preload” section or LiteSpeed Cache’s “Page Optimization” settings.
How to optimze Images and Implement Lazy-Loading to speed up your website?
Images are the heaviest part of most websites. Optimizing them is non-negotiable.
Resize Images Before Upload
WordPress lets you upload massive images and automatically resizes them. Resize images before uploading them.
If your largest content width is 1200 pixels, your images should be 1200 pixels wide maximum. Uploading 4000-pixel-wide images wastes server space and bandwidth.
Use free plugins like Optimole or EWWW Image Optimizer to resize and compress images. Aim for under 200KB per image if possible.
Convert to WebP
WebP is a modern image format that’s 25-35% smaller than JPEG with the same visual quality. All modern browsers support it.
Plugins like Imagify, ShortPixel, or Optimole automatically convert images to WebP on upload. LiteSpeed Cache includes WebP conversion. WP Rocket integrates with Imagify.
Set your plugin to convert all images to WebP and serve WebP to supported browsers. Keep the original format as a fallback for older browsers.
Lazy Load Images
Lazy loading only loads images when they are about to come into the user’s view, saving bandwidth and improving page load times. This means images below the fold don’t load until the user scrolls down.
Most caching plugins include lazy loading. Enable it in WP Rocket under Media or in LiteSpeed Cache under Media Settings. If you prefer a dedicated plugin, a3 Lazy Load works well with Breakdance.
WordPress has had native lazy loading since version 5.5. It adds loading=”lazy” to image tags automatically. Your caching plugin’s lazy loading might be redundant. Test with and without to see which performs better.
Responsive Images and Srcset
Modern browsers support responsive images using the srcset attribute. This lets the browser choose the appropriate image size based on the device’s screen size.
<img src="small.jpg"
     srcset="small.jpg 400w, medium.jpg 800w, large.jpg 1200w"
     sizes="(max-width: 600px) 400px, (max-width: 1000px) 800px, 1200px"
     alt="Descriptive alt text">
This code tells the browser to pick the best image size for the screen. WordPress generates srcset automatically when you upload images.
Make sure your theme and Breakdance respect the srcset attribute. Most modern setups do this automatically.
Image suggestion: Screenshot showing responsive image sizes in different viewports. Alt text: “Example of responsive images loading different sizes based on screen width”
How does Database Optimization and Cleanup improve Website Loading Speed?
Your WordPress database stores everything: posts, pages, settings, user data, and temporary information. Over time, it fills with junk that slows down queries.
Database bloat comes from several sources. Post revisions (WordPress saves every draft), trashed posts, spam comments, transients (temporary data), and orphaned metadata all pile up.
A clean database means faster queries, which means faster page loads. Let’s fix it.
Understanding Database Tables
WordPress uses multiple database tables. The wp_posts table stores your content. The wp_postmeta table stores metadata about your posts. The wp_options table stores site settings and plugin data.
When these tables grow too large, queries slow down. A site with 10,000 post revisions and 50,000 orphaned metadata rows will struggle.
Post Revisions
Every time you save a draft, WordPress creates a revision. Write a blog post with 20 saves? You now have 20 copies in your database. Multiply this across hundreds of posts and you have thousands of unnecessary rows.
You can limit revisions by adding this line to your wp-config.php file:
define('WP_POST_REVISIONS', 3);This code limits WordPress to keeping only the last 3 revisions per post. This reduces database bloat going forward.
To delete existing old revisions, use a plugin like WP-Optimize or Advanced Database Cleaner. These plugins scan your database and remove old revisions safely.
Cleaning with WP-Optimize
WP-Optimize is a free plugin that cleans your database automatically. Install it from the WordPress plugin repository.
Go to WP-Optimize > Database. You’ll see options to remove post revisions, trashed posts, spam comments, and expired transients. Check the boxes for what you want to clean and click “Run optimization.”
Enable automatic cleanups. Go to WP-Optimize > Settings and turn on scheduled cleanup. Set it to run weekly. This keeps your database lean without manual intervention.
Cleaning with Advanced Database Cleaner
Advanced Database Cleaner is more powerful than WP-Optimize. It finds orphaned data that other plugins miss.
Install the plugin and go to Advanced Database Cleaner > General Cleaning. Run the scan. The plugin will find orphaned post meta, comment meta, user meta, and relationship data.
Review the results carefully before deleting anything. Orphaned data is usually safe to remove, but verify you’re not deleting active plugin data.
WooCommerce Database Maintenance
WooCommerce stores a lot of temporary data. Customer sessions, order notes, and product transients all add up fast.
WooCommerce has a built-in cleanup tool. Go to WooCommerce > Status > Tools. You’ll find options to clear transients, clear customer sessions, and regenerate product lookup tables.
Run “Clear transients” weekly or monthly. This removes expired temporary data that WooCommerce stores for caching.
Optimizing Database Tables
Over time, database tables become fragmented. Optimizing them reorganizes the data for faster access.
In WP-Optimize, go to Database > Optimize database tables and run the optimization. This is like defragmenting a hard drive. It doesn’t delete anything, just reorganizes for efficiency.
Run this monthly or quarterly. It only takes a few seconds.
What Not to Delete
Never delete active plugin settings unless you’re removing the plugin. Don’t delete user data or order data unless you’re certain it’s obsolete. Always back up your database before running cleanups.
Plugin Audit: What to Keep, Replace, or Remove
Plugins are both a blessing and a curse. They add functionality but also add weight. Every plugin loads its own code, which slows your site.
The goal isn’t zero plugins. The goal is the right plugins. Here’s how to audit what you have.
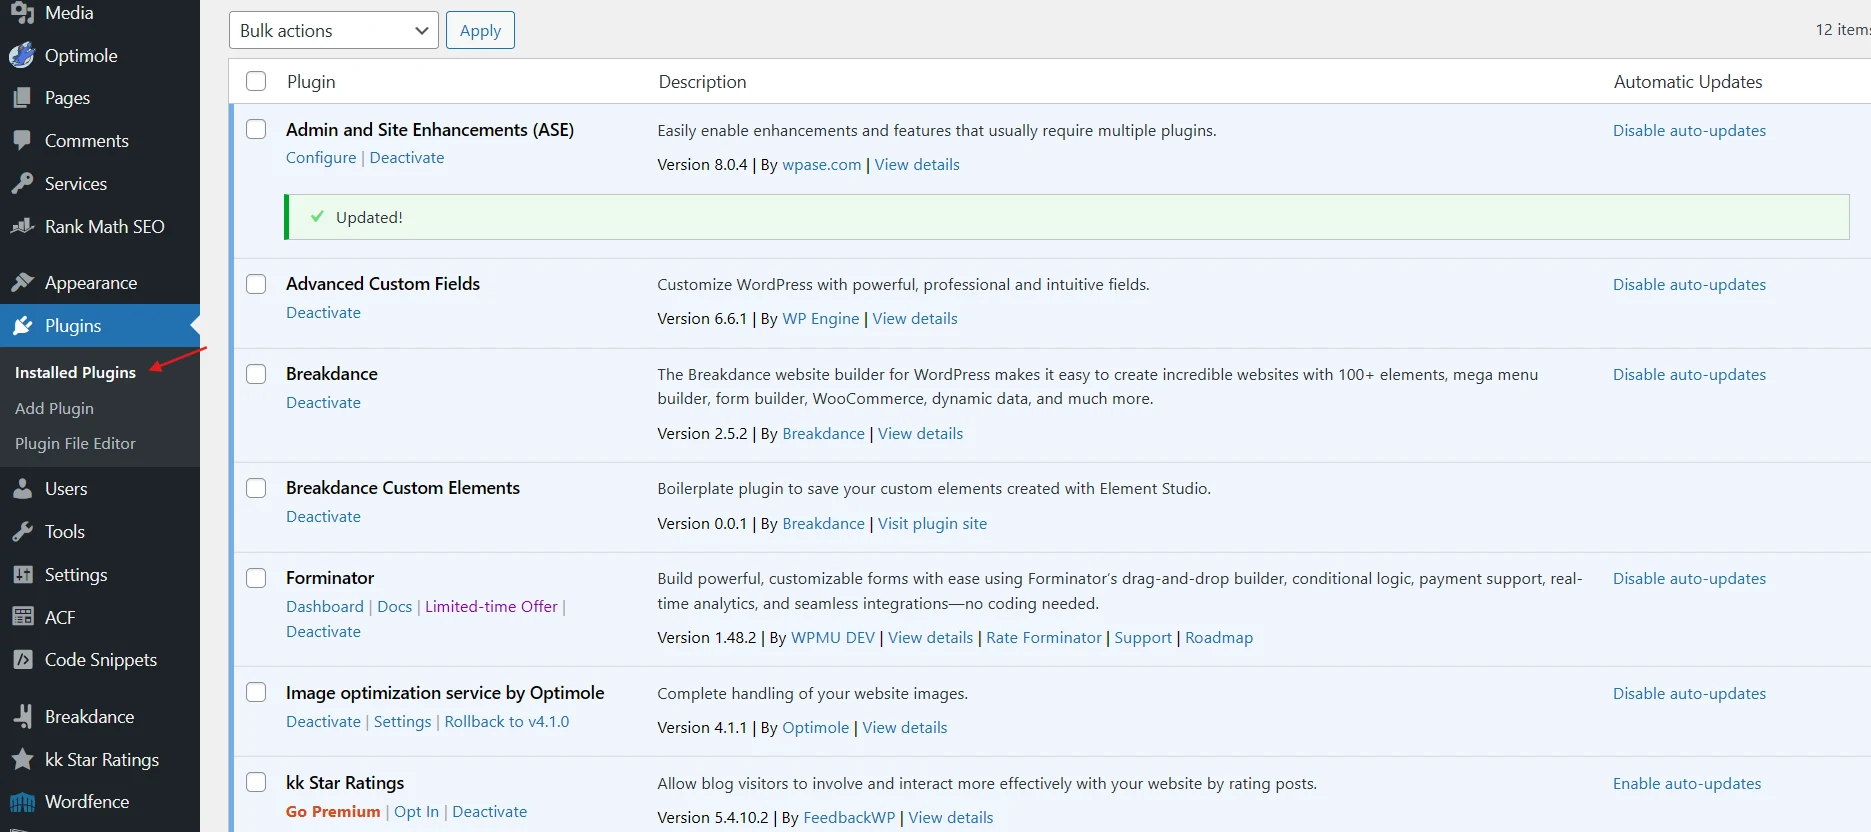
Step 1: List All Active Plugins
Go to Plugins > Installed Plugins. Write down every active plugin and what it does. Be honest about whether you actually use each feature.
Step 2: Identify Overlapping Functionality
Do you have three plugins that all manipulate images? Pick the best one and remove the others. Do you have multiple SEO plugins? Choose one (Rank Math or Yoast) and stick with it.
Breakdance itself handles many functions that plugins used to provide. If you have a separate slider plugin but Breakdance has a built-in slider element, remove the plugin and rebuild using Breakdance.
Step 3: Check Plugin Impact
Install the Query Monitor plugin. It shows you which plugins are adding database queries and slowing down your site.
Activate Query Monitor and visit your homepage. Click the Query Monitor menu in the admin bar and go to Queries by Component. You’ll see exactly how many database queries each plugin is adding.
Plugins adding 50+ queries per page are suspects. Investigate whether you really need them or if there’s a lighter alternative.
Step 4: Test Deactivating Plugins
Create a staging site to test changes safely. Deactivate plugins one by one and run speed tests after each deactivation.
Use GTmetrix or PageSpeed Insights to measure the impact. If deactivating a plugin improves your score by 10+ points, consider whether that plugin is worth the performance cost.
Common Plugin Replacements
Social sharing buttons: Replace heavy plugins like AddThis with lightweight alternatives like Grow by Mediavine or Simple Social Icons.
Related posts: Replace Jetpack Related Posts with Contextual Related Posts, which is much lighter.
Contact forms: If you’re using a heavy form builder but only need a simple contact form, switch to Contact Form 7 or WPForms Lite.
Backup plugins: Move backups to your hosting provider’s built-in backup system. Many hosts offer free automatic backups that don’t slow down your live site.
WooCommerce Plugin Audit
WooCommerce sites tend to accumulate plugins. Here’s what to watch for.
Payment gateway plugins often load scripts on every page, even when not needed. Make sure your payment plugins only load on the cart and checkout pages.
Shipping calculator plugins can be heavy. If you use table rate shipping, make sure the plugin isn’t running complex calculations on every page load.
Product filter plugins add significant overhead. If you’re using AJAX filters, make sure they’re cached properly.
The Plugin Minimum
Most Breakdance sites can run well with fewer than 15 plugins. A typical lean setup includes: Breakdance Pro, a caching plugin, a security plugin, an SEO plugin, and possibly WooCommerce plus 2-3 WooCommerce extensions.
If you have 30+ plugins, you almost certainly have redundancy and bloat. Aim to cut that number in half.
Before you remove any plugin, back up your site. Some plugins store critical data that doesn’t transfer when you delete them.
How to Measure your Website Performance?
You can’t improve what you don’t measure. Speed testing tools give you objective data about your site’s performance.
PageSpeed Insights
PageSpeed Insights is Google’s official speed testing tool. Go to pagespeed.web.dev and enter your URL.
PageSpeed Insights tests both mobile and desktop performance. It gives you a performance score (0-100) and identifies specific problems.
Focus on the Core Web Vitals section. These three metrics (LCP, FID/INP, CLS) directly affect your Google search rankings.
The Opportunities section shows specific improvements you can make, ranked by potential impact. Start with the recommendations that save the most time.
The Diagnostics section identifies issues that don’t directly slow load time but might affect user experience.
GTmetrix
GTmetrix provides more detailed waterfall charts and historical tracking. Sign up for a free account at gtmetrix.com.
After signing in, you can test from multiple locations worldwide. This matters because your site might load fast in the US but slow in Europe if your server is US-based.
The waterfall chart shows every resource your page loads, in order. Long bars indicate slow-loading resources. Look for patterns: are all your images slow? Is a specific JavaScript file blocking everything else?
GTmetrix also shows fully loaded time and total page size. Aim for under 3 seconds fully loaded time and under 2MB total page size.
WebPageTest
WebPageTest is the most advanced free testing tool. Go to webpagetest.org.
You can test from dozens of locations using different browsers and connection speeds. This reveals how your site performs for users on slower connections.
The filmstrip view shows your page loading frame by frame. This helps you see what users actually experience. If your page looks blank for 3 seconds before content appears, you have a render-blocking problem.
Advanced users can run tests with and without specific resources (like blocking a particular JavaScript file) to measure its impact.
Lighthouse
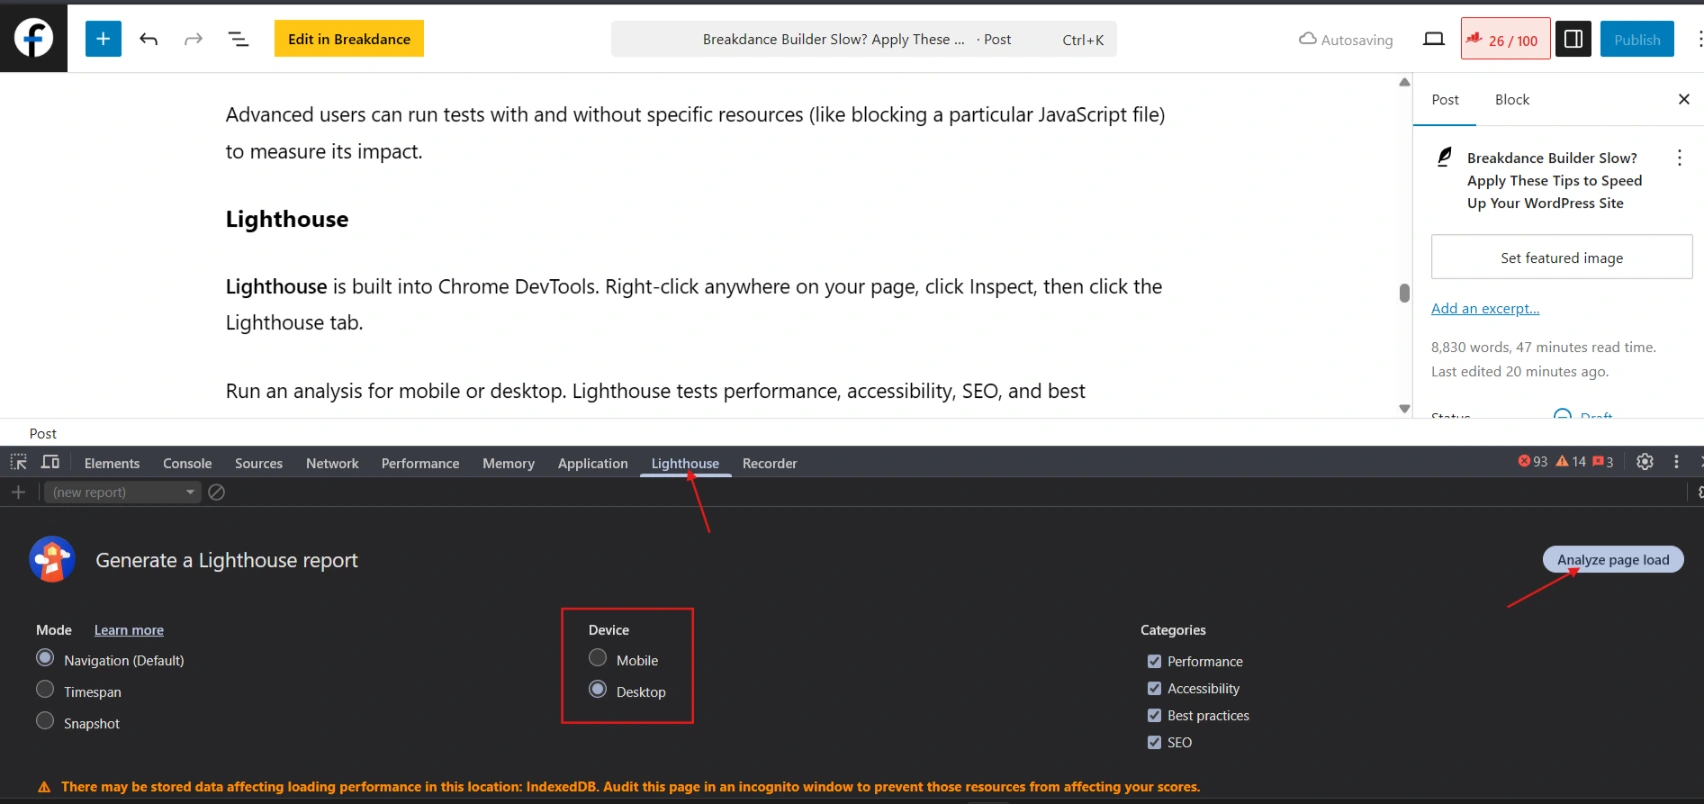
Lighthouse is built into Chrome DevTools. Right-click anywhere on your page, click Inspect, then click the Lighthouse tab.
Run an analysis for mobile or desktop. Lighthouse tests performance, accessibility, SEO, and best practices.
The performance section breaks down your load time into specific phases: First Contentful Paint, Speed Index, Largest Contentful Paint, Time to Interactive, Total Blocking Time, and Cumulative Layout Shift.
Understanding Key Metrics
Largest Contentful Paint (LCP) measures when the largest visible element loads. Good LCP is under 2.5 seconds. This is the most important metric for perceived speed.
LCP problems usually come from large images, slow servers, or render-blocking resources. Fix LCP by optimizing images, upgrading hosting, and implementing proper caching.
First Contentful Paint (FCP) measures when the first text or image appears. Good FCP is under 1.8 seconds. FCP shows how quickly your page starts rendering.
Improve FCP by reducing server response time and eliminating render-blocking CSS and JavaScript in the head.
Cumulative Layout Shift (CLS) measures visual stability. It tracks how much content shifts around while loading. Good CLS is under 0.1.
CLS problems come from images without dimensions, ads, and dynamically injected content. Fix CLS by specifying width and height for all images and reserving space for ads and dynamic content.
Time to First Byte (TTFB) measures server response time. Good TTFB is under 600ms. Slow TTFB means your server or hosting is the bottleneck.
Improve TTFB by upgrading hosting, implementing server-level caching, or using a CDN.
Total Blocking Time (TBT) measures how long the main thread is blocked from responding to user input. Good TBT is under 200ms.
High TBT usually means JavaScript is executing too long. Break up large JavaScript tasks, defer non-critical scripts, and remove unnecessary scripts.
Which Metrics Matter Most
For perceived speed (how fast your site feels), prioritize LCP and FCP. Users judge speed by when they see content, not when everything finishes loading.
For user experience, prioritize CLS and TBT. Layouts shifting around and unresponsive pages frustrate users, even if they load quickly.
For SEO, Google’s Core Web Vitals (LCP, INP/FID, CLS) directly affect rankings. Focus on these three if search traffic is your goal.
What Impact does your Hosting have on your Website’s Performance?
Your hosting is the foundation everything else builds on. A slow host will cripple even a perfectly optimized site.
Shared Hosting Limitations
Shared hosting means your site lives on a server with dozens or hundreds of other sites. You share CPU, RAM, and bandwidth with all of them.
When another site on your server gets a traffic spike, your site slows down. When the server fills up, everyone suffers. Shared hosting is cheap but unpredictable.
Most shared hosts also limit PHP workers, which restricts how many simultaneous visitors you can handle. Breakdance sites on shared hosting often hit these limits during traffic spikes.
When to Upgrade
If your TTFB (Time to First Byte) consistently exceeds 800ms even with caching, your hosting is the problem. No amount of optimization fixes a slow server.
If your site handles fine at 100 visitors per day but crashes at 500, you’ve outgrown shared hosting.
If you’re running WooCommerce with any decent traffic, shared hosting won’t cut it.
Better Hosting Options
Managed WordPress Hosting: Companies like Flywheel, Kinsta, and WP Engine specialize in WordPress. They provide server-level caching, automatic updates, and expert support. Prices start around $30-35 per month.
Cloud Hosting: DigitalOcean, Linode, or Vultr gives you a dedicated virtual server. You’ll need to manage it yourself or use a control panel like RunCloud. This gives you full control and excellent performance for $10-20 per month.
LiteSpeed Hosting: If you plan to use LiteSpeed Cache, get hosting that runs LiteSpeed servers. Hostinger, Namecheap, and many others offer LiteSpeed hosting starting around $5-10 per month.
Before switching hosts, ask these questions: What’s the TTFB from your location? Do they offer staging environments? What’s included in automatic backups? What kind of support do they provide?
Always back up your site before migrating hosts. Use a plugin like Duplicator or All-in-One WP Migration to create a complete backup you can restore if anything goes wrong.
What are the Advanced Techniques for Power Users?
Once you’ve handled the basics, these advanced techniques can squeeze out additional performance.
Server-Level Optimizations
If you have access to your server configuration, consider these optimizations.
HTTP/2 or HTTP/3: Make sure your server uses HTTP/2 or HTTP/3. These newer protocols are much faster than HTTP/1.1. Most modern hosts enable this by default, but verify in your hosting control panel.
PHP Version: Use PHP 8.0 or newer. PHP 8 is significantly faster than PHP 7.4, which is faster than older versions. Go to your hosting control panel and check your PHP version. Update if you’re using anything older than 7.4.
OPcache: PHP OPcache stores precompiled PHP code in memory, dramatically speeding up PHP execution. Most good hosts enable this by default. Verify it’s active by installing the WP Opcache plugin or checking with your host.
Redis or Memcached: Object caching stores database query results in memory. This is especially valuable for WooCommerce stores and membership sites with complex queries. Check if your host offers Redis or Memcached, then install the appropriate WordPress plugin to use it.
Content Security Policy and Resource Hints
Content Security Policy (CSP) headers tell browsers which resources are safe to load. While primarily a security feature, CSP can also improve performance by preventing unnecessary resource loads.
Resource hints like preload, prefetch, and preconnect tell browsers which resources to prioritize. We covered preconnect earlier. Here’s preload:
<link rel="preload" href="/your-critical-font.woff2" as="font" type="font/woff2" crossorigin>This code tells the browser to download the font immediately as a high priority. This ensures your font loads before the browser would normally discover it.
Use preload sparingly. Preloading too many resources actually hurts performance by overwhelming the browser.
Service Workers for Advanced Caching
Service workers are JavaScript that runs in the background and can intercept network requests. They enable offline functionality and advanced caching strategies.
Implementing service workers requires technical knowledge. Progressive Web App (PWA) plugins like SuperPWA add service worker functionality to WordPress sites.
Service workers cache your entire site in visitors’ browsers. After the first visit, your site loads almost instantly. This is the next level of caching beyond traditional browser caching.
Prefetching Next Page
Some sites prefetch the next likely page a user will visit. When users hover over a link, the browser starts downloading that page in the background. When they click, the page loads instantly.
The Flying Pages plugin adds instant page loads using this technique. Install it, configure which pages to prefetch, and users will experience near-instant navigation.
Be careful with this technique. It increases server load and bandwidth usage because you’re loading pages that users might not actually visit. Test carefully to make sure the benefits outweigh the costs.
What are the Common Breakdance Speed Issues? and How to Solve them?
Even with optimization, you might hit specific problems. Here’s how to diagnose and fix common issues.
Problem: High LCP Despite Small Images
If your LCP is high but your images are optimized, the issue is likely render-blocking resources or slow server response.
Check your TTFB first. If it’s over 600ms, your server is the bottleneck. Upgrade hosting or investigate server-level problems.
If TTFB is fine, check for render-blocking CSS and JavaScript. Use PageSpeed Insights’ recommendations to identify which files are blocking the render.
Problem: Layout Shift (Poor CLS)
If content jumps around while loading, you’re missing dimensions on images or other elements.
Go through your Breakdance elements and specify explicit width and height for all images. Even if you’re using responsive sizing, include the aspect ratio.
Check for elements that load dynamically, like ads or embedded content. Reserve space for them in your layout so the content doesn’t shift when they load.
Problem: Site Loads Fast for You, Slow for Visitors
This usually means you’re testing with a cached version while visitors hit the server.
Clear your browser cache completely. Better yet, test in an incognito window or use actual speed testing tools like GTmetrix.
Check your caching plugin’s exclusions. Make sure you’re not accidentally excluding visitors from caching while admins get cached pages.
Problem: Some Pages Fast, Others Slow
Inconsistent performance usually points to specific heavy elements on slow pages.
Compare the slow pages to the fast pages. What’s different? More images? Video embeds? Complex queries? External scripts?
Use Query Monitor to see which plugins and queries are active on slow pages but not fast ones.
Problem: Mobile Much Slower Than Desktop
Mobile devices have less processing power and often slower connections. Mobile performance requires extra attention.
Test your mobile PageSpeed Insights score specifically. Look at the mobile-specific recommendations.
Common mobile killers: massive hero images, JavaScript-heavy sliders, unoptimized web fonts, and excessive animations. Simplify your mobile layouts in Breakdance’s responsive settings.
Problem: Speed Degraded After Plugin Update
Sometimes plugin updates introduce performance regressions. If your site suddenly got slower after updating, the recent update is the likely culprit.
Use WP Rollback plugin to downgrade to the previous version of the plugin temporarily. Test if performance improves.
If the old version was faster, report the issue to the plugin developer and stay on the old version until they fix it.
Quick Takeaways
- Enable all Breakdance Performance settings to disable unnecessary WordPress features like WP Emoji, Dashicons, XML-RPC, and Gutenberg CSS. This reduces HTTP requests and script execution time.
- Install a quality caching plugin appropriate for your hosting. Use LiteSpeed Cache on LiteSpeed hosting, or WP Rocket on any other host. Caching is the single biggest performance improvement you can make.
- Optimize images before uploading. Resize to actual display dimensions, convert to WebP, and enable lazy loading. Images are usually the heaviest part of your site.
- Clean your database regularly to remove post revisions, transients, and orphaned data. Use WP-Optimize or Advanced Database Cleaner to automate this monthly.
- Audit plugins ruthlessly and remove anything you don’t actively use. Every plugin adds weight. Use Query Monitor to identify performance hogs.
- Set up Cloudflare CDN for free global content delivery. This distributes your files worldwide and reduces load on your origin server.
- Measure with real tools like PageSpeed Insights and GTmetrix, not just your personal browsing experience. Test as a logged-out visitor would experience the site, not as an admin.
Conclusion
Breakdance Builder isn’t slow. Your site is slow because of how it’s configured and hosted. The difference is critical because it means you can fix it.
Every second of load time you shave off translates directly to better user experience, higher conversion rates, and improved search rankings. Google’s data shows that as page load time goes from 1 second to 3 seconds, the probability of bounce increases 32%. From 1 second to 5 seconds, it increases by 90%. Speed isn’t a nice-to-have. It’s make-or-break for your website’s success.
The optimizations in this guide work. They’re based on real performance principles and tested across thousands of WordPress sites. You don’t need all of them. Start with the basics: Breakdance Performance settings, a good caching plugin, image optimization, and database cleanup. Those four steps alone will produce dramatic improvements.
As you get comfortable with the basics, layer in the advanced techniques. Add a CDN. Optimize your CSS and JavaScript delivery. Fine-tune your Core Web Vitals. Each step compounds the previous ones.
Speed optimization isn’t a one-time task. Your site will accumulate bloat over time. Plan to run database cleanups monthly, audit plugins quarterly, and retest performance whenever you make major changes.
If you’ve followed this guide and still aren’t seeing the results you want, the problem might be beyond DIY fixes. Sometimes you need expert help to diagnose server-level issues, complex conflicts, or architectural problems. That’s okay. Knowing when to ask for help is part of being a smart site owner.
Ready to take your site speed to the next level? If you’re struggling with implementation or want professional optimization, specialized WordPress performance services can audit your site, implement fixes, and monitor ongoing performance. A fast site is an investment in your online presence that pays dividends in traffic, conversions, and customer satisfaction.
Don’t let a slow site hold you back. Your visitors deserve better, your business deserves better, and now you know to deliver it.
Looking for an Expert Breakdance Builder Designer and Developer. Check out my Breakdance Website Design and Development Services
Frequently Asked Questions
Is Breakdance slower than other page builders like Elementor or Divi?
Will WP Rocket work with Breakdance or should I use a different caching plugin?
How can I speed up my WooCommerce store built with Breakdance?
Consider upgrading to managed WordPress hosting if you’re on basic shared hosting, as WooCommerce stores need more resources.